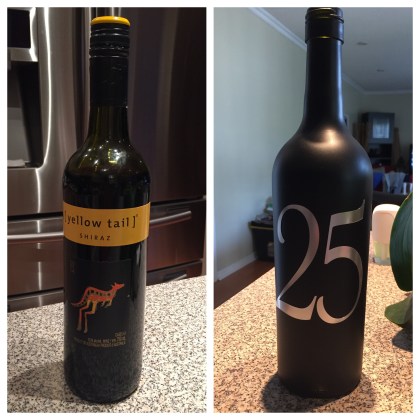
Last year, I used a DIY solution that offered a cheap and creative way to display table numbers and serve as a menu card holder using old wine bottles. With a little painting and some crafting, we ended up with an all flat black bottle with laser cut numbers on it.
 Here’s the step by step method on how to make these classy flat black bottles.
Materials:
Old wine bottles & cork
Kettle
Paring knife
Dishwashing soap
Container (one that can fit a wine bottle inside)
Goo Gone
Paper towels
Flat black paint (I used a spray paint)
Large moving box (optional)
Thick wire hanger
Black or copper steel wire (you can purchase this Home Depot)
Small long nose cutter
Cylinder form (wooden rod or thick marker)
Laser cut numbers sticker
STEP 1: Peel labels off the bottles
There are two ways to peel the labels off the bottles. Start with boiling water in a kettle.
› For foil type labels, place your bottle inside the sink and pour the hot water into the bottle, enough that it goes above the level of the label. Let it sit for a few minutes; the heat will loosen the glue of the label. Using a paring knife, peel corner of the label then use your hands to slowly peel off the label.
› For paper type labels, the label will not easily peel off, not as clean as foil type label. To remove this type of label, pour hot water dishwashing soap inside the container. Place bottle inside the container; the hot water and soap will soften the paper. Let it sit for a few minutes. Then slowly peel off the label. If label doesn’t peel off clean, use paring knife to scrape off label.
STEP 2: Clean excess glue on bottles
Using the Go Gone, spray a little amount on the bottle and use paper towels to clean off excess glue on the bottles. Then wash, rinse then dry.
STEP 3: Paint bottles
Take large moving box and build this into a square, sealing the bottom end and keeping top end open. Place bottle inside and spray bottle. By doing using this method, you avoid getting paint all over your work area (unless you have a work shed or a garage that you don’t mind getting paint all over, then omit the use of a box). Use the wire hanger to switch sides of bottle. Paint bottle generously. Let dry. This is how your bottle should look like once it is dry.
STEP 4: Shave the half-end end of the wine cork thinner
Trying to re-insert the cork into the wine bottle can be a bit tricky. Shave the half-end of cork thinner, making into a triangle shape. Set aside, once finished.
STEP 5: Make your wire holder
Take black steel wire and cut about 5-6” long using your long nose pliers. Holding the cylinder form on one hand, wrap the wire around the form twice and close together, leaving ends long. Cross the two ends over once, then remove the form off the round loop. Finish off twisting ends 2 more times. Cut end leaving enough to push in through the cork.
STEP 6: Push wire holder through the top end of the cork
Take your shaved cork and insert on top of the wind bottle. Take your finished wire holder and insert the pointed end through the top end of the cork.
STEP 7: Stick number on wine bottle
I am lucky enough that I have a laser cutter machine that I used to cut the numbers. For those who don’t have one, you can print numbers using your choice of font and size on a printer and cut the numbers individually. Then, take the number and trace them on white 8”x11” sticker paper (paper sold at Staples). After tracing, cut the numbers and stick them on your painted wine bottle.
STEP 8: Insert menu in your wire holder
You can use these painted bottles in many different ways. You can paint them in different colours such as gold, silver or copper and use them as design elements within your home. You can also use them as candle holders for long candle sticks which would make for a dramatic yet cheap event décor.
Happy Crafting!
Just me,


I read this blog full. Nice idea. thanks for sharing.